Ansible – Store N recent directories and artifacts

Goal:

There is a directory “/opt/application” where the archive with the application is downloaded and unpacked into a directory where the short derivative of the HASH commit (8 characters) is used as the name. And a symbolic link is created to this directory. It is necessary to store only the 3 latest versions of the application, both directories, and archives, and also do not delete directories called:

  • logs
  • media

Also, the deletion should be done using regex, so that in the future it does not delete directories that may be created.

Playbook:

---
- hosts: all
  tasks:
    - name: Find all application directories
      find:
        paths: "/opt/application/"
        file_type: directory
        use_regex: yes
        patterns:
          - '[a-z0-9]{8,8}'
        excludes: 'logs,media'
      register: dirs

    - name: Keep only the last 3 directories
      file:
        path: "{{ item }}"
        state: absent
      with_items: "{{ (dirs.files | sort(attribute='atime', reverse=True))[3:] | map(attribute='path') | list }}"

    - name: Find application artifacts
      find:
        paths: "/opt/application/"
        file_type: file
        use_regex: yes
        patterns:
          - '^[a-z0-9]{8,8}.tar.gz$'
      register: artifacts

    - name: Keep only the last 3 artifacts
      file:
        path: "{{ item }}"
        state: absent
      with_items: "{{ (artifacts.files | sort(attribute='atime', reverse=True))[3:] | map(attribute='path') | list }}"


 Python – AWS S3 keep N latest artifacts

This script gets a list of all directories in the bucket and deletes all objects in each directory, except for the last “N” specified. To run the script, you need to pass two arguments:

  • Bucket name
  • Number of last stored objects

How to use it:

python3 main.py artifacts-artem-services 3


main.py:

import sys
import boto3

def cleanup():
    get_last_modified = lambda obj: int(obj['LastModified'].strftime('%s'))

    s3 = boto3.client('s3')
    result = s3.list_objects(Bucket=bucket, Delimiter='/')
    for dir in result.get('CommonPrefixes'):
        print('Directory: ' + str(dir['Prefix']))
        artifacts_listing = s3.list_objects_v2(Bucket = bucket, Prefix = dir.get('Prefix'))['Contents']
        artifacts_sorted = [obj['Key'] for obj in sorted(artifacts_listing, key=get_last_modified)]
        for artifact in artifacts_sorted[:-keep_last]:
            print('Deleting artifact: ' + str(artifact))
            s3.delete_object(Bucket = bucket, Key = artifact)

if sys.argv[1:] and sys.argv[2:]:
    bucket = sys.argv[1]
    keep_last = int(sys.argv[2])
    cleanup()
else:
    print("This script for cleanup old artifacts in S3 bucket")
    print("Usage  : python3 " + sys.argv[0] + " {BUCKET_NAME} " + "{NUMBER_OF_THE_LAST_KEEPING_ARTIFACTS}")
    print("Example: python3 " + sys.argv[0] + " artifacts-artem-services " + "3")

 EKS – Encrypt current PV (EBS Volume)

The answer was taken from gitmemory

In order to encrypt an already created EBS Volume, you need to take a snapshot of it. Then, from the created snapshot, create a disk in the same region as the original one, and also specify the KMS key for encryption.

Then we save the manifest of the current PV to a file:

kubectl get pv <PV_NAME> -o yaml > /tmp/pv.yaml


We edit the file, replacing the ID of the original disk with the encrypted one.

Then apply the changes:

kubectl replace --cascade=false --force -f /tmp/pv.yaml


The previous command will “get stuck” on execution, as the “finalizers” parameter prevents it, so in the next tab we do the following:

kubectl edit pv <PV_NAME>


Find and remove the following:

  finalizers:
  - kubernetes.io/pv-protection


We save the changes, after which the command in the previous tab should work successfully.


After that, patch the PVC to which this PV belongs:

kubectl patch pvc <PVC_NAME> -p '{"metadata":{"finalizers": []}}' --type=merge


Now all that’s left is to delete the pod that the PV is mounted to and make sure it is re-created with the new PV mounted. Also, do not forget about the rights to use KMS keys for the IAM role, which is attached to EKS nodes.

 Jenkins – Active Choice: PostgreSQL – Return result of SELECT query

For a parameterized assembly with an image tag selection, you will need the Active Choices plugin

Go to “Manage Jenkins


Section “Manage Plugins


Go to the “Available” tab and select “Active Choices” in the search.

Install it. You also need plugins:

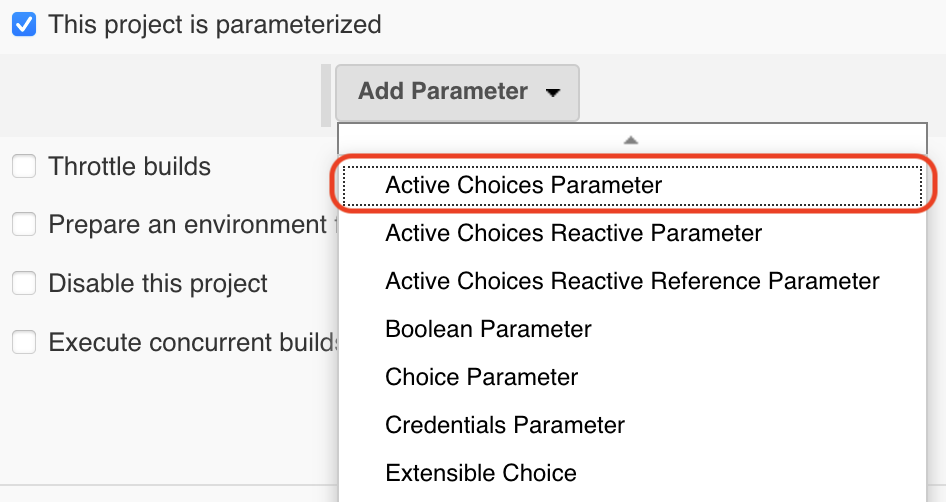
Create a “New Item” – “Pipeline“, indicate that it will be a parameterized assembly, and add the parameter “Active Choices Parameter


We indicate that this is “Groovy Script” and paste the following into it:

import groovy.sql.Sql
import java.sql.Driver

credentialsId = 'artem-services-rds-credentials'
url = 'artem-services-rds.xxxxxxxxxxxx.eu-central-1.rds.amazonaws.com:5432/postgres'

def creds = com.cloudbees.plugins.credentials.CredentialsProvider.lookupCredentials(
  com.cloudbees.plugins.credentials.common.StandardUsernameCredentials.class, Jenkins.instance, null, null ).find{
    it.id == credentialsId
  }

def driver = Class.forName('org.postgresql.Driver').newInstance() as Driver 

def props = new Properties()
props.setProperty("user", "${creds.username}") 
props.setProperty("password", "${creds.password}")

def conn = driver.connect("jdbc:postgresql://${url}", props) 
def sql = new Sql(conn)

def artifact = []

artifact.add("Not selected")

def rows = sql.rows("select * from users").each { row ->
  artifact.add("$row.first_name")
}

return artifact


Where is the value of the variables, “credentialsId” – Jenkins Credentials ID with login and password to connect to the database;

url” – database connection string (endpoint + port + db name);


This Active Choice makes a SELECT query on the “users” table and returns only the values of the “first_name” fields, as well as adding “Not selected” to the first position of the result.

AWS – S3 Allow Access for Organization Members

In order to allow read access from the S3 Bucket for all members included in the organization, the following policy must be applied to the S3 Bucket:

{
  "Version": "2012-10-17",
  "Statement": {
    "Sid": "AllowOrganizationToReadBucket",
    "Effect": "Allow",
    "Principal": "*",
    "Action": [
      "s3:GetObject",
      "s3:ListBucket"
    ],
    "Resource": [
      "arn:aws:s3:::stackset-lambdas",
      "arn:aws:s3:::stackset-lambdas/*"
    ],
    "Condition": {
      "StringEquals": {"aws:PrincipalOrgID":["o-xxxxxxxxxx"]}
    }
  }
}


Where “stackset-lambdas” is the S3 Bucket name and “o-xxxxxxxxxx” is your Organization ID.

Lambda – For stopping EC2 instances, RDS instances and ASG downscale in all regions

This Python script gets a list of all regions, finds EC2 instances, RDS instances and ASG in them, and if there is no “prevent_stop” tag equal to “true” on the resource, then it stops this resource, and in the case of ASG it scaledown it to 0.

main.py:

import boto3

custom_ec2_filter = [
    {
        'Name': 'instance-state-name',
        'Values': ['running', 'pending']
    }
]

# Get list of EC2 regions
ec2 = boto3.client('ec2')
regions = [region['RegionName'] for region in ec2.describe_regions()['Regions']]

def main(event, context):
    for region in regions:
        print("Region: " + str(region))
        # ASG
        print("Searching for ASG...")
        asg = boto3.client('autoscaling', region_name = region)
        asg_list = [asg_name['AutoScalingGroupName'] for asg_name in asg.describe_auto_scaling_groups()['AutoScalingGroups']]
        for asg_name in asg_list:
            api_response = asg.describe_auto_scaling_groups(
                AutoScalingGroupNames = [
                    asg_name,
                ]
            )
            tags = (api_response["AutoScalingGroups"][0]["Tags"])
            asg_scaledown = False 
            if 'prevent_stop' not in [tag['Key'] for tag in tags]:
                asg_scaledown = True
            else:
                for tag in tags:
                    if tag["Key"] == 'prevent_stop' and tag["Value"] != 'true':
                        asg_scaledown = True
            if asg_scaledown == True:
                minSize = (api_response["AutoScalingGroups"][0]["MinSize"])
                maxSize = (api_response["AutoScalingGroups"][0]["MaxSize"])
                desiredCapacity = (api_response["AutoScalingGroups"][0]["DesiredCapacity"])
                if minSize != 0 or maxSize != 0 or desiredCapacity != 0:
                    print("Scalling down ASG: " + str(asg_name))
                    asg.update_auto_scaling_group(
                        AutoScalingGroupName = asg_name,
                        MinSize = 0,
                        MaxSize = 0,
                        DesiredCapacity = 0
                    )
        # EC2 Instances
        print("Searching for running instances...")
        ec2 = boto3.resource('ec2', region_name = region)
        instances_list = ec2.instances.filter(Filters = custom_ec2_filter)
        for instance in instances_list:
            if 'prevent_stop' not in [tag['Key'] for tag in instance.tags]:
                print("Stopping instance: " + str(instance.id))
                instance.stop()
            else:
                for tag in instance.tags:
                    if tag["Key"] == 'prevent_stop' and tag["Value"] != 'true':
                        print("Stopping instance: " + str(instance.id))
                        instance.stop()
        # RDS
        print("Searching for running RDS instances...")
        rds = boto3.client('rds', region_name = region)
        rds_list = [instance['DBInstanceIdentifier'] for instance in rds.describe_db_instances()['DBInstances']]
        for instance in rds_list:
            arn = rds.describe_db_instances(DBInstanceIdentifier = instance)['DBInstances'][0]['DBInstanceArn']
            tags = rds.list_tags_for_resource(ResourceName = arn)['TagList']
            stop_instance = False
            if 'prevent_stop' not in [tag['Key'] for tag in tags]:
                stop_instance = True
            else:
                for tag in tags:
                    if tag["Key"] == 'prevent_stop' and tag["Value"] != 'true':
                        stop_instance = True
            if stop_instance == True:
                instance_status = rds.describe_db_instances(DBInstanceIdentifier = instance)['DBInstances'][0]['DBInstanceStatus']
                if instance_status != "stopping" and instance_status != "stopped":
                    engine = rds.describe_db_instances(DBInstanceIdentifier = instance)['DBInstances'][0]['Engine']
                    print("Engine: " + str(engine))
                    if engine.startswith('aurora') == True:
                        cluster_id = rds.describe_db_instances(DBInstanceIdentifier = instance)['DBInstances'][0]['DBClusterIdentifier']
                        print("Stopping Aurora cluster: " + str(cluster_id))
                        rds.stop_db_cluster(DBClusterIdentifier = cluster_id)
                    else:
                        print("Stopping RDS instances: " + str(instance))
                        rds.stop_db_instance(DBInstanceIdentifier = instance)
        print("----------------------------------------")

if __name__ == '__main__':
    main()


List of required permissions to run (besides the “AWSLambdaExecute” policy):

  • ec2:DescribeRegions
  • ec2:DescribeInstances
  • ec2:StopInstances
  • rds:ListTagsForResource
  • rds:DescribeDBInstances
  • rds:StopDBInstance
  • autoscaling:DescribeAutoScalingGroups
  • autoscaling:UpdateAutoScalingGroup

PagerDuty – Python script for creating events

This Python script creates events in PagerDuty using APIv2.

The following script was taken as a basis.

First you need to create a “Routing Key“, aka “Integration Key“, not to be confused with “API Access Key“, which can be used for any API calls, we only need a key from a specific service.

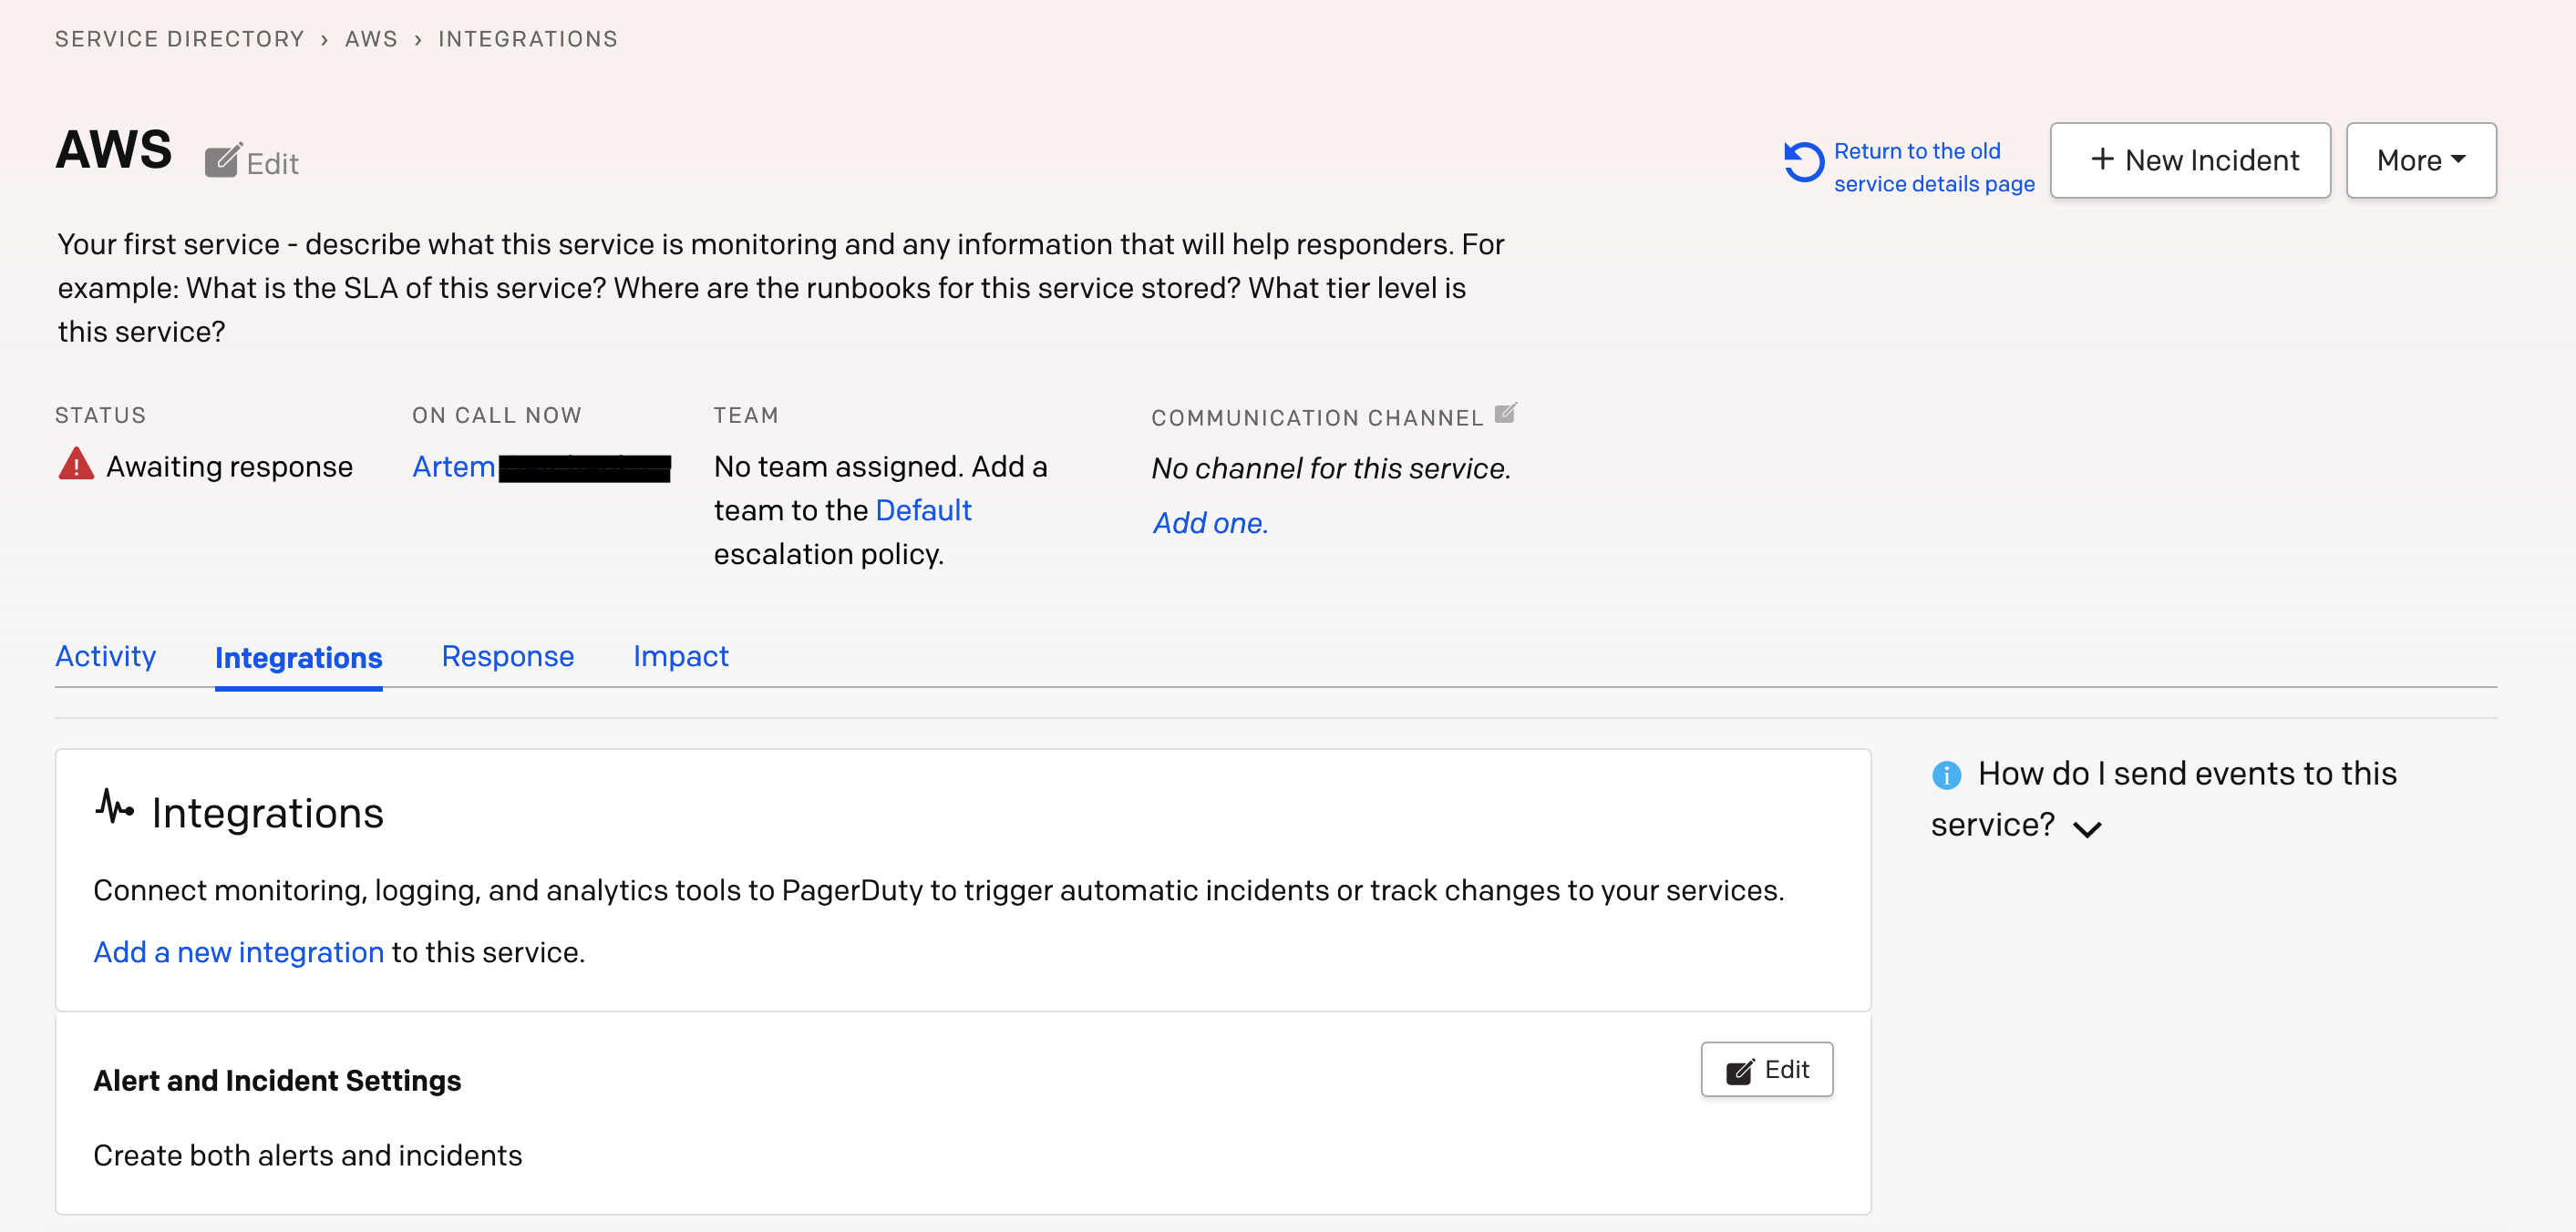
Go to the service settings, in my case it is called “AWS“, and go to the “Integrations” tab


Select – “Add a new integration


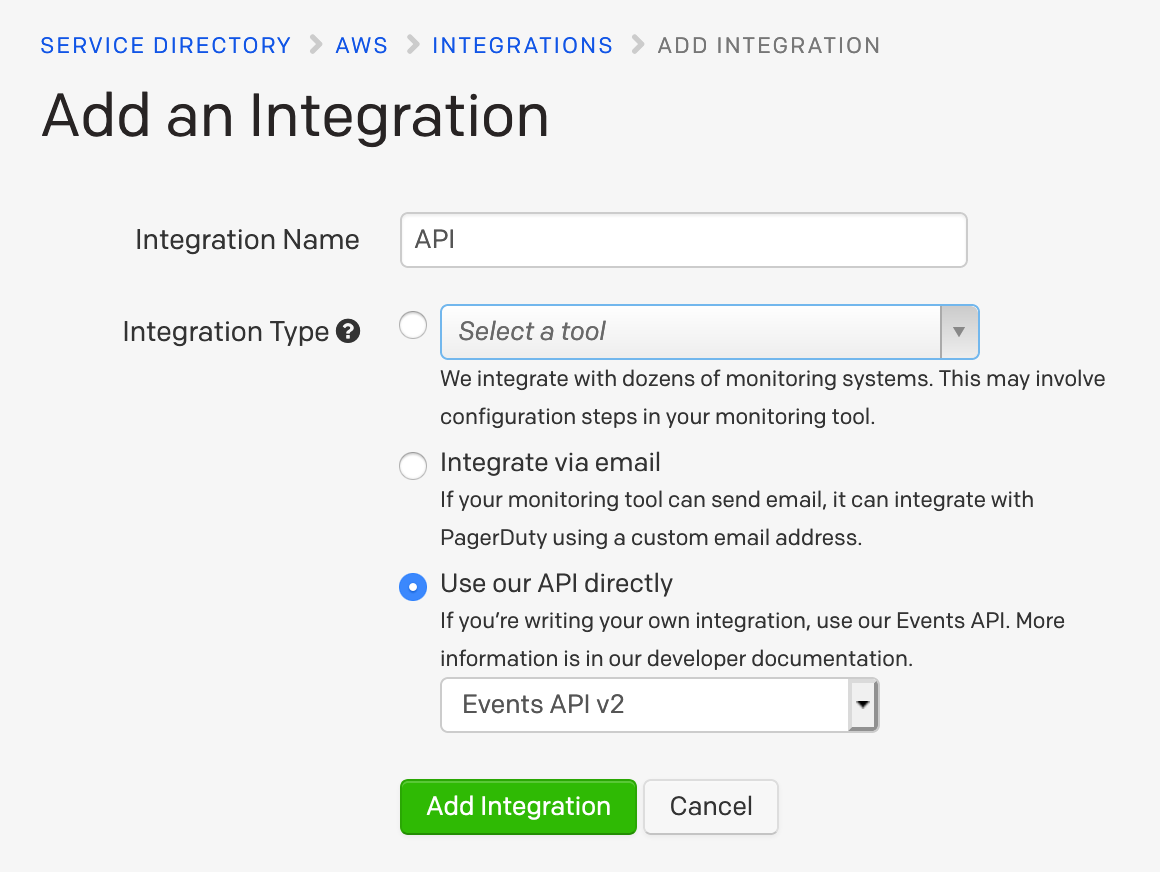
Set the name and select “Integration Type” -> “Use our API directly” -> “Events API v2” and get “Integration Key

main.py:

import requests
import json

from typing import Any, Dict, List, Optional

routing_key = 'abc123'
api_url = 'https://events.pagerduty.com/v2/enqueue'

def create_event(
    summary: str,
    severity: str,
    source: str = 'aws',
    action: str = 'trigger',
    dedup_key: Optional[str] = None,
    custom_details: Optional[Any] = None,
    group: Optional[str] = None,
    component: Optional[str] = None,
    class_type: Optional[str] = None,
    images: Optional[List[Any]] = None,
    links: Optional[List[Any]] = None
) -> Dict:
    payload = {
        "summary": summary,
        "severity": severity,
        "source": source,
    }
    if custom_details is not None:
        payload["custom_details"] = custom_details
    if component:
        payload["component"] = component
    if group:
        payload["group"] = group
    if class_type:
        payload["class"] = class_type

    actions = ('trigger', 'acknowledge', 'resolve')
    if action not in actions:
        raise ValueError("Event action must be one of: %s" % ', '.join(actions))
    data = {
        "event_action": action,
        "routing_key": routing_key,
        "payload": payload,
    }
    if dedup_key:
        data["dedup_key"] = dedup_key
    elif action != 'trigger':
        raise ValueError(
            "The dedup_key property is required for event_action=%s events, and it must \
            be a string."
            % action
        )
    if images is not None:
        data["images"] = images
    if links is not None:
        data["links"] = links

    response = requests.post(api_url, json = data)
    print(response.content)

def main():
    create_event(summary = "Instance is down", severity = 'critical', custom_details = "Instance ID: i-12345")
  
if __name__ == '__main__':
    main()


Change the value of the variable “routing_key” to the value “Integration Key

In this example, an event with the “critical” level will be created with the “Instance is down” title and “Instance ID: i-12345” will be specified in detail.

The script can also be used to create events based on AWS CloudWatch Alarms without using the AWS PagerDuty integration. To do this, create an SNS topic, a Lambda function and specify the SNS topic as the source for the Lambda function. After that, you can create a CloudWatch Alarm and specify the SNS topic as an action when triggered.

main.py (Lambda + SNS):

import requests
import json

from typing import Any, Dict, List, Optional

routing_key = 'abc123'
api_url = 'https://events.pagerduty.com/v2/enqueue'

def get_message_info():
    subject = event["Records"][0]["Sns"]["Subject"]
    message = event["Records"][0]["Sns"]["Message"]
    return subject, message

def create_event(
    summary: str,
    severity: str,
    source: str = 'cloudwatch',
    action: str = 'trigger',
    dedup_key: Optional[str] = None,
    custom_details: Optional[Any] = None,
    group: Optional[str] = None,
    component: Optional[str] = None,
    class_type: Optional[str] = None,
    images: Optional[List[Any]] = None,
    links: Optional[List[Any]] = None
) -> Dict:
    payload = {
        "summary": summary,
        "severity": severity,
        "source": source,
    }
    if custom_details is not None:
        payload["custom_details"] = custom_details
    if component:
        payload["component"] = component
    if group:
        payload["group"] = group
    if class_type:
        payload["class"] = class_type

    actions = ('trigger', 'acknowledge', 'resolve')
    if action not in actions:
        raise ValueError("Event action must be one of: %s" % ', '.join(actions))
    data = {
        "event_action": action,
        "routing_key": routing_key,
        "payload": payload,
    }
    if dedup_key:
        data["dedup_key"] = dedup_key
    elif action != 'trigger':
        raise ValueError(
            "The dedup_key property is required for event_action=%s events, and it must \
            be a string."
            % action
        )
    if images is not None:
        data["images"] = images
    if links is not None:
        data["links"] = links

    response = requests.post(api_url, json = data)
    print(response.content)

def main(event, context):
    info = get_message_info()
    create_event(summary = info[0], severity='critical', custom_details = info[1])
  
if __name__ == '__main__':
    main()


The Python package “requests” will have to be zipped with the Lambda function, since Lambda doesn’t have it. You can use “virtualenv” for this.

AWS Transfer – Public FTP

AWS Transfer supports 3 protocols: SFTP, FTP, and FTPS. And only SFTP can have a public endpoint, FTP/FTPS can only be run inside a VPC. Also for login/password authorization, you must use a custom provider, you can find more information about this here.

Goal:

Create an AWS Transfer server for the FTP protocol, the service must be public and authorization must also be by login / password.

FTP is insecure and AWS does not recommend using it on public networks.


The first thing you need is the AWS SAM CLI installed.

Create a directory where we will download the template, go to it and download:

wget https://s3.amazonaws.com/aws-transfer-resources/custom-idp-templates/aws-transfer-custom-idp-secrets-manager-sourceip-protocol-support-apig.zip


Unzip and run the following command:

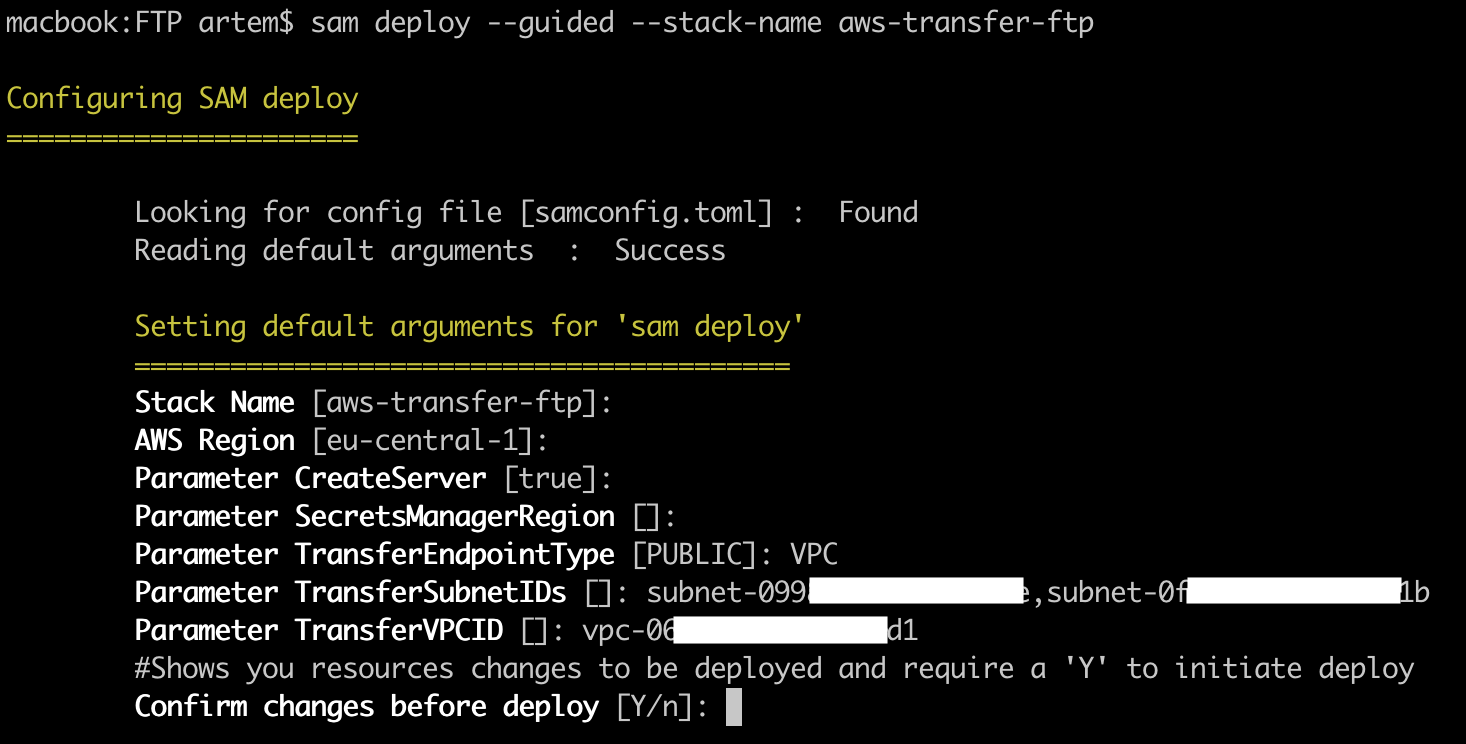
sam deploy --guided --stack-name aws-transfer-ftp


Where, “aws-transfer-ftp” is the name of the created CloudFormation stack, if you specify the name of an existing one, it will update it.


Then the interactive installation will start, where you will be prompted to specify the following parameters:

  • Stack Name – the name of the CloudFormation stack, the default is the value of the “–stack-name” key parameter;
  • AWS Region – the region where the CloudFormation stack will be deployed;
  • Parameter CreateServer – whether AWS Transfer service will be created (by default – true);
  • Parameter SecretManagerRegion – if your region does not support SecretsManager, then you can specify a separate region for it;
  • Parameter TransferEndpointType – PUBLIC or VPC, since FTP does not support public endpoints, specify VPC;
  • Parameter TransferSubnetIDs – ID‘s of the subnets in which the AWS Transfer endpoint will be;
  • Parameter TransferVPCID – VPC ID where the subnets specified in the previous parameter are located.


Let’s create a SecurityGroup for the FTP service in the required VPC. And we will allow incoming traffic to TCP ports 21 and 81928200 from any address. While we save the created SG, we will attach it in the future.

Then go to the AWS Console – “AWS Transfer Family“, find the server created by AWS Transfer and edit its protocol, uncheck the “SFTP” protocol and select “FTP” protocol, and save the changes.

Now we need to add access to FTP from the world, for this we will use NLB. First, let’s find out the private IP addresses of VPC endpoint for AWS Transfer, for this in the “Endpoint details” block, click on the link to the VPC endpoint.


Go to the “Subnets” tab and copy all the IP addresses, they will be needed to create target groups.
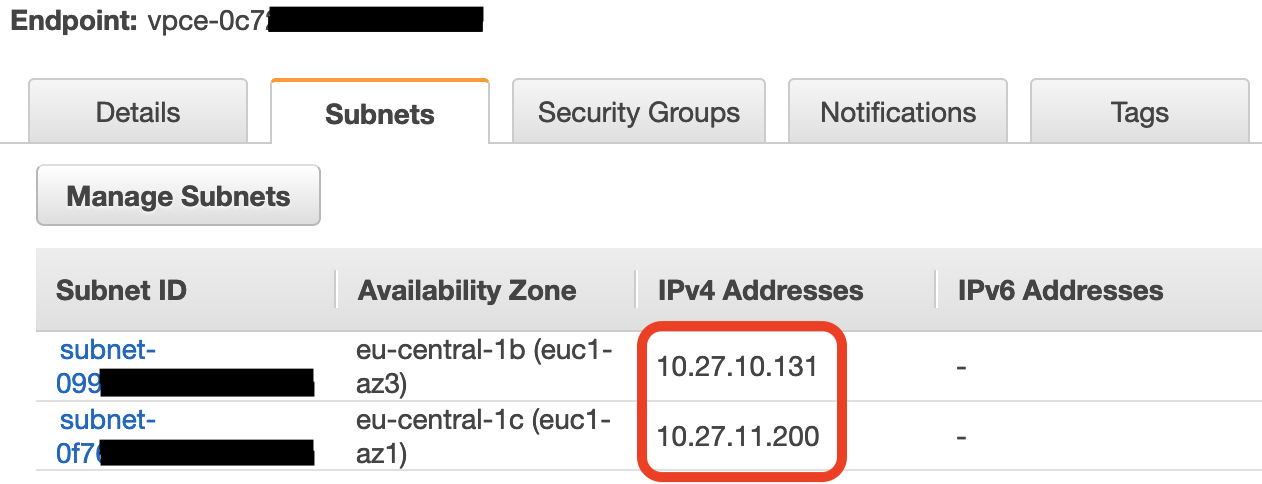
 

Go to the “Security Groups” tab and change the default security group to the one created earlier.

Now let’s create a target group, for this in the AWS console go to “EC2” -> “Load Balancing” -> “Target Groups” and create the first target group for TCP port 21.

  • Target type: IP address
  • Protocol: TCP
  • Port: 21

It is better to indicate the port number in the name of the target group at the end, since there will be 10 of them and you can easily get confused.

We will also indicate the VPC in which the AWS Transfer service was created. In the next tab, one by one, we will indicate the IP addresses of the VPC endpoint, which we looked at earlier. We save the target group.

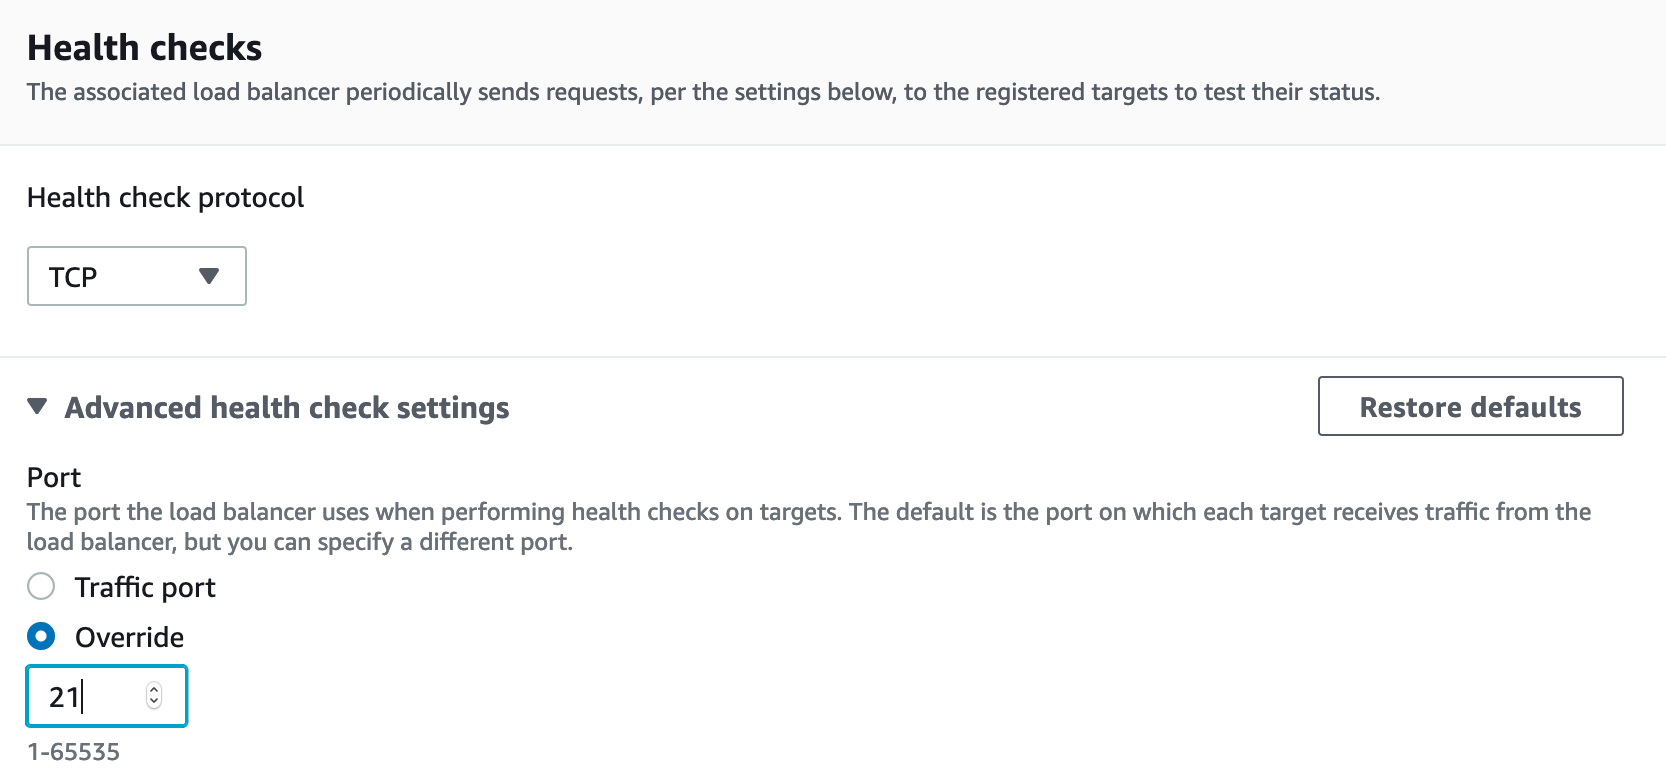
Now you need to create 9 more target groups for the port range: TCP 81928200. The procedure is the same as for the target group for port 21, except that you need to specify port 21 for HeathCheck. To do this, in the “Health checks” block, open the “Advanced health check setting” tab, select “Overrive” and specify the port number – 21.

After we are done with target groups, we need to create an “internet-facingNetwork Load Balancer and place it on public networks of the same VPC where the AWS Transfer service is. We also create 10 listeners, for TCP ports 21, and for the range 81928200, and for each listener we point the desired target group corresponding to the port number. After which the FTP service must be accessible from outside.

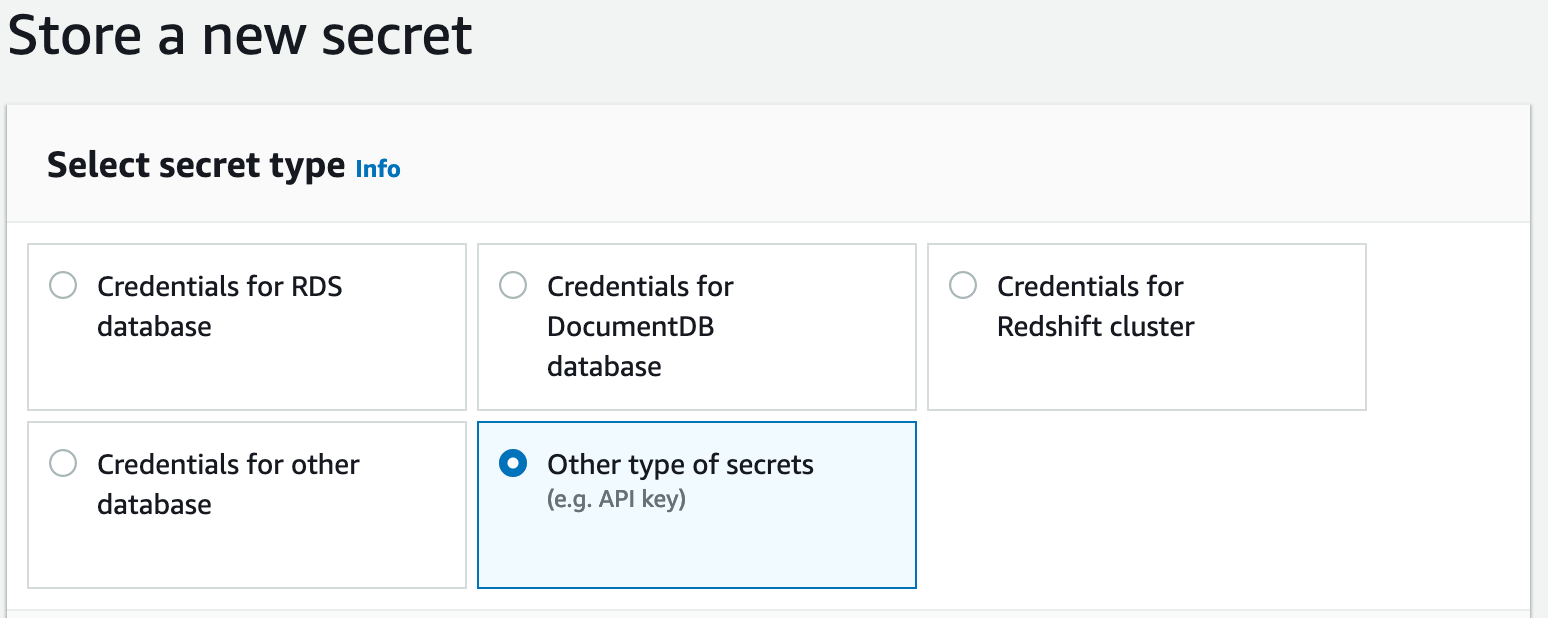
In order to add an FTP user, go to the “Secrets Manager” in the AWS console and create a secret with the “Other type of secrets” type.


Create 3 “key/value” pairs:

  • Password – password for the new FTP user;
  • Role – ARN of the role that has write permission to the required S3 bucket;
  • HomeDirectoryDetails – [{“Entry”: “/”, “Target”: “/s3-bucket/user-name”}]

Where “s3-bucket” is the name of the S3 bucket, “user-name” is the name of the directory that the user will go to when connecting to the FTP server (the directory name does not have to match the username, and may also be located outside the root of the bucket)


We must save the secret with a name in the format: “server_id/user_name“, where “server_id” is the AWS Transfer server ID, “user_name” is the username that will be used to connect to the FTP server.

For convenience, you can also create a DNS CNAME record for the NLB record.